
Copper looks like it should be easy to weld — it’s soft, it’s workable, and you’ve soldered it before without much trouble. But the moment you strike an arc, something feels off. The heat vanishes fast. The base metal warps before you can react. The weld pool behaves nothing like steel. That’s not user error. That’s physics. Copper conducts heat 11 times faster than mild steel. Everything you learned about welding other metals needs to be reset before you touch a copper joint.
Trying TIG welding copper for the first time? Struggling to understand why your copper welding joint strength keeps falling short? This guide cuts straight to what works — the right preheat temperatures, filler choices, and method comparisons that save you from expensive, frustrating mistakes.
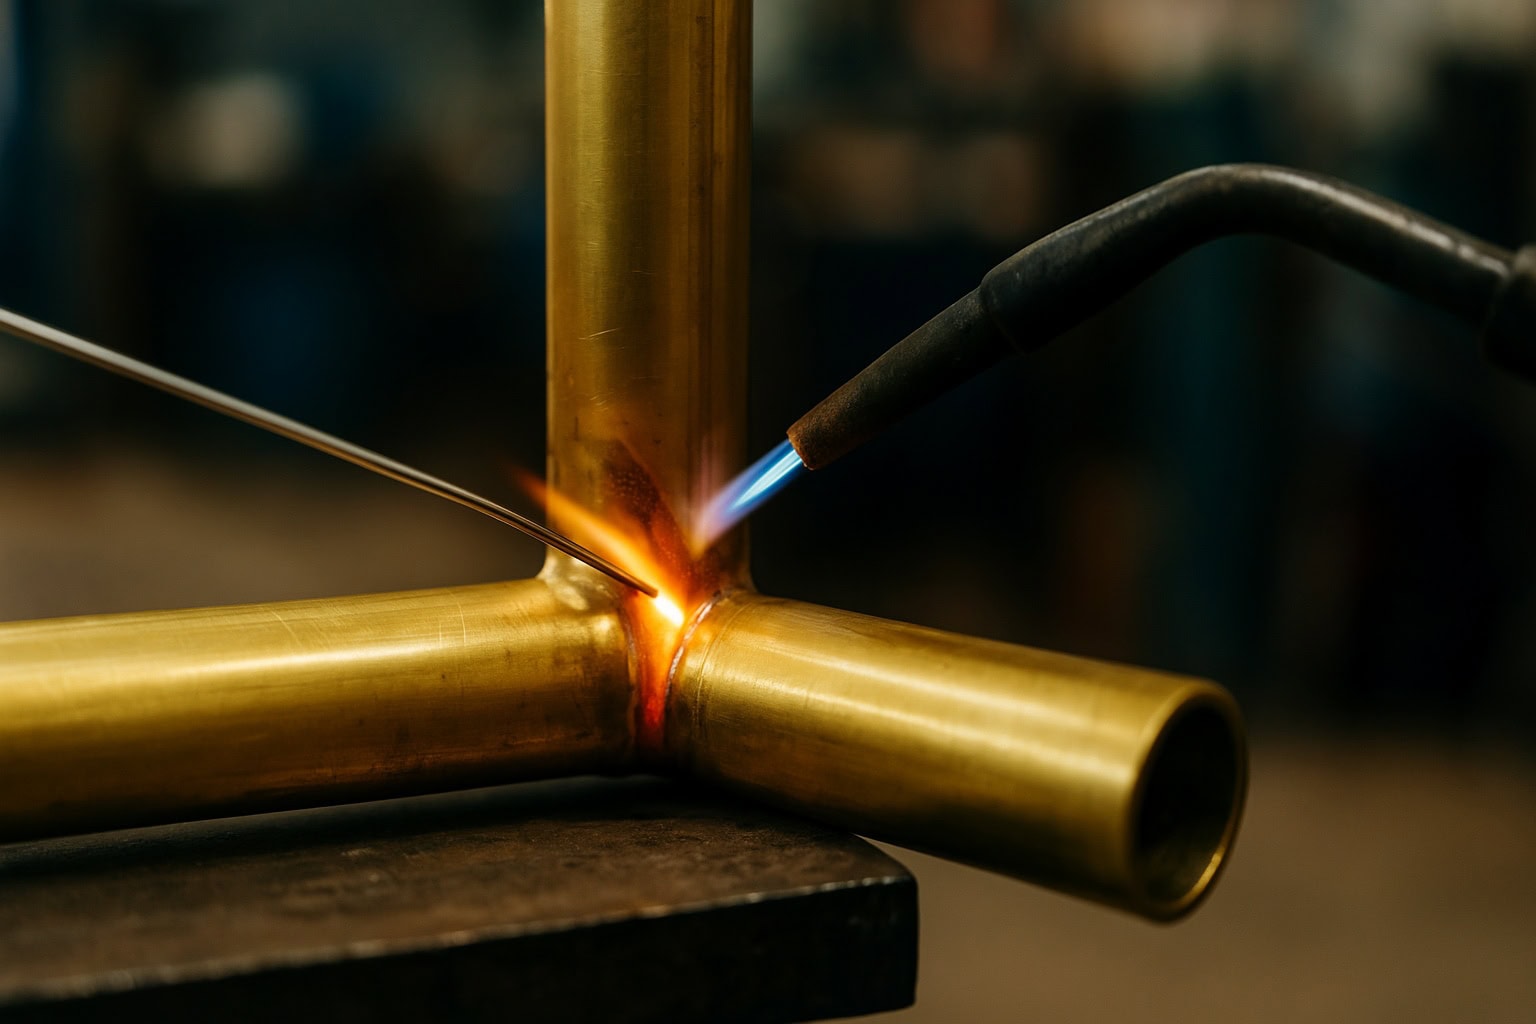
Why Welding Copper Is Harder Than Most Metals (And What That Means for Beginners)
Here’s a number that explains everything: 400 W/m·K.
That’s copper’s thermal conductivity — about 10× higher than steel. The moment your arc hits the surface, heat spreads rapidly away from the weld zone. The melt pool disappears faster than you can build it. You’re not slow — the material is just working against you.
That one property creates three real problems in copper welding:
- Energy demand spikes. Copper needs 2–5× more heat input than steel. A typical 200A TIG setup often struggles on 1/8″ copper — in many cases, 300A or more is required to form a stable melt pool.
- Distortion happens fast. Copper expands more under heat, making warping far more likely. By the time you notice movement, the deformation has already occurred.
- Oxidation weakens the weld. At high temperatures, oxygen inside the copper forms oxides that contaminate the weld zone, leading to porosity and reduced strength.
What Beginners Go Through
Most beginners fail in one of two ways:
Under-heating (most common). The arc looks stable, but the base metal never fully melts. The joint may appear solid but fails quickly under stress.
Over-heating. Increasing power without proper shielding leads to porosity and weak welds, especially when gas protection is insufficient.
A common real-world issue: skipping proper preparation (like deoxidation or shielding adjustments) often results in porous welds that fail under pressure, even when they look acceptable on the surface.
Can You Join Copper? But Wait, Do You Actually Need to “Weld” It?
—— Understanding the Critical Differences: Soldering, Brazing, and Welding
Many beginners walk into a hardware store calling every metal-joining process “welding.” However, trying to use a basic electronics soldering iron for a structural load-bearing bracket—or using an industrial TIG welder for a simple household water pipe—is a recipe for failure, if not disaster.
Joining copper involves three distinct physical processes. Choosing the right one will save you thousands of dollars in equipment costs and hundreds of hours of frustration.
1. Core Comparison of the Three Processes
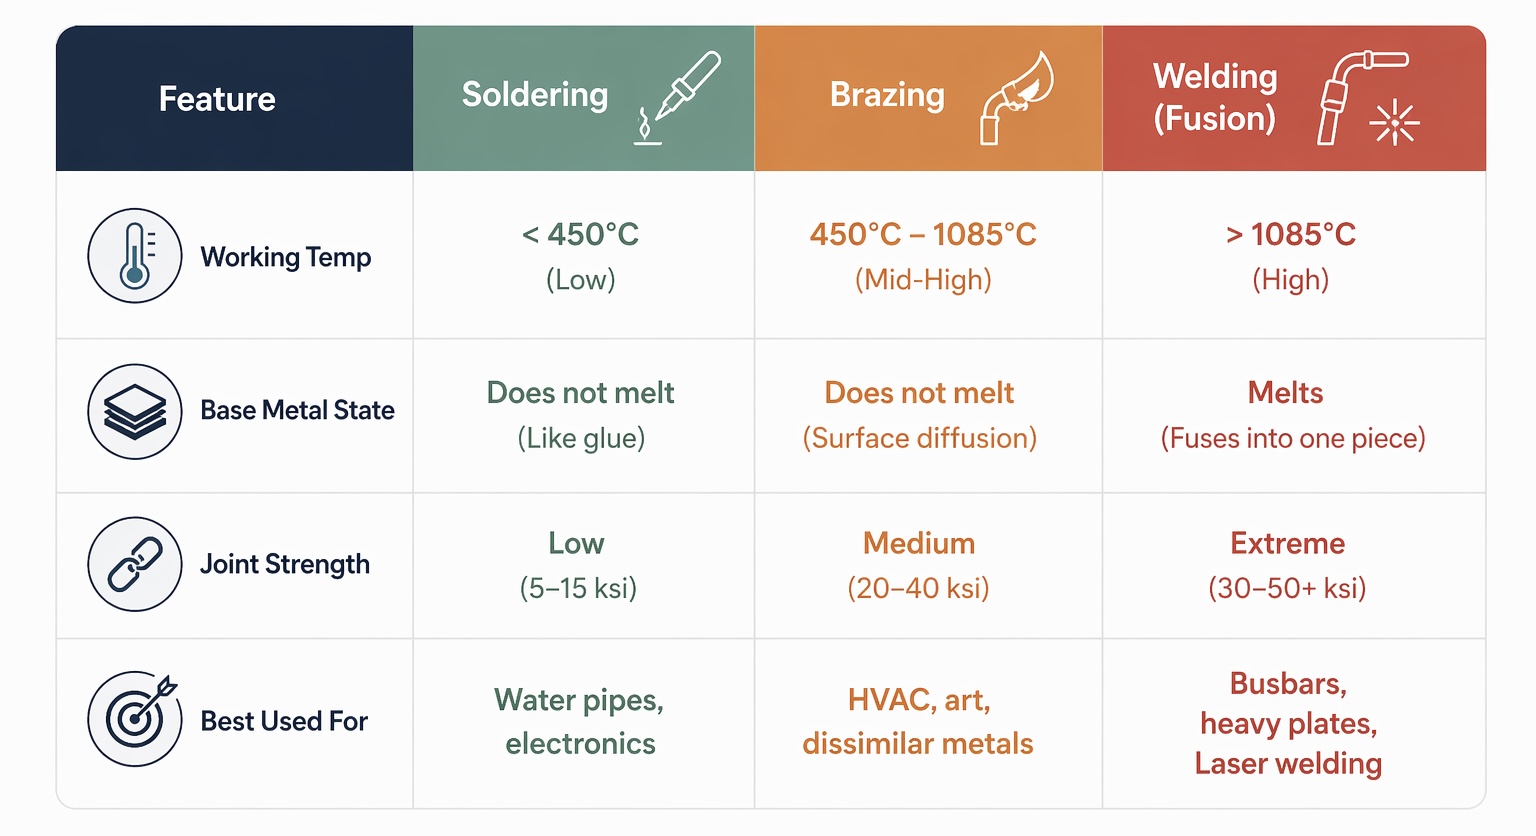
2. Deep Dive: Which One Should You Choose?
● For Quick Fixes: Choose Soldering
This is the “household standard.” If you are fixing a leaky copper pipe in the basement or DIY-ing a copper pipe bookshelf, soldering is more than enough to handle residential water pressures under 150 psi.
- Pros: Low barrier to entry; can be done with a simple propane torch.
- Cons: Low structural strength; cannot withstand heavy tension or intense vibration.
● For Vibration Resistance & Sealing: Choose Brazing
Brazing is the gold standard for the HVAC (Heating, Ventilation, and Air Conditioning) industry. While it still doesn’t melt the base metal, the use of silver or phosphorus-based filler rods creates a much stronger molecular bond than solder.
- Pros: Excellent for joining copper to other metals (like stainless steel).
- Cons: Large heat-affected zone (HAZ), which can warp thin copper parts.
● For Maximum Strength & Conductivity: Choose Welding
This is true fusion. Under the power of an electric arc or a laser, the base metal melts instantly and fuses with the filler rod to become a single, solid piece.
- Pros: The joint strength is equal to the base metal itself. It offers the lowest electrical resistance for power industry busbars and heavy-duty tanks.
- Cons: Traditional methods (TIG/MIG) are notoriously difficult for beginners to master.
3. Pro-Tips for Beginners
Key Insight:
If your workpiece is between 0.5mm and 5mm thick and you want the high strength of welding without the “nightmare” learning curve of TIG, Fiber Laser Welding is the smartest shortcut in 2026.
Laser welding falls under the “Welding” category, but it replaces the “blunt force” heat of an arc with the precision of a “scalpel.” It allows you to achieve laboratory-grade seams without blowing through or warping your copper sheets.
Summary: Identify your application first. Fixing a pipe? Buy some solder paste. Building an industrial product or a high-strength structure? Read on, as we dive deep into how to conquer the most challenging but powerful technique: Fusion Welding.
Choosing the Right Welding Method for Copper: TIG vs MIG vs Laser Welding
Three methods sit on the table. Each one handles copper in its own way — and picking the wrong one doesn’t just slow you down. It wastes material, burns time, and produces joints that fail under load.
Here’s what separates them.
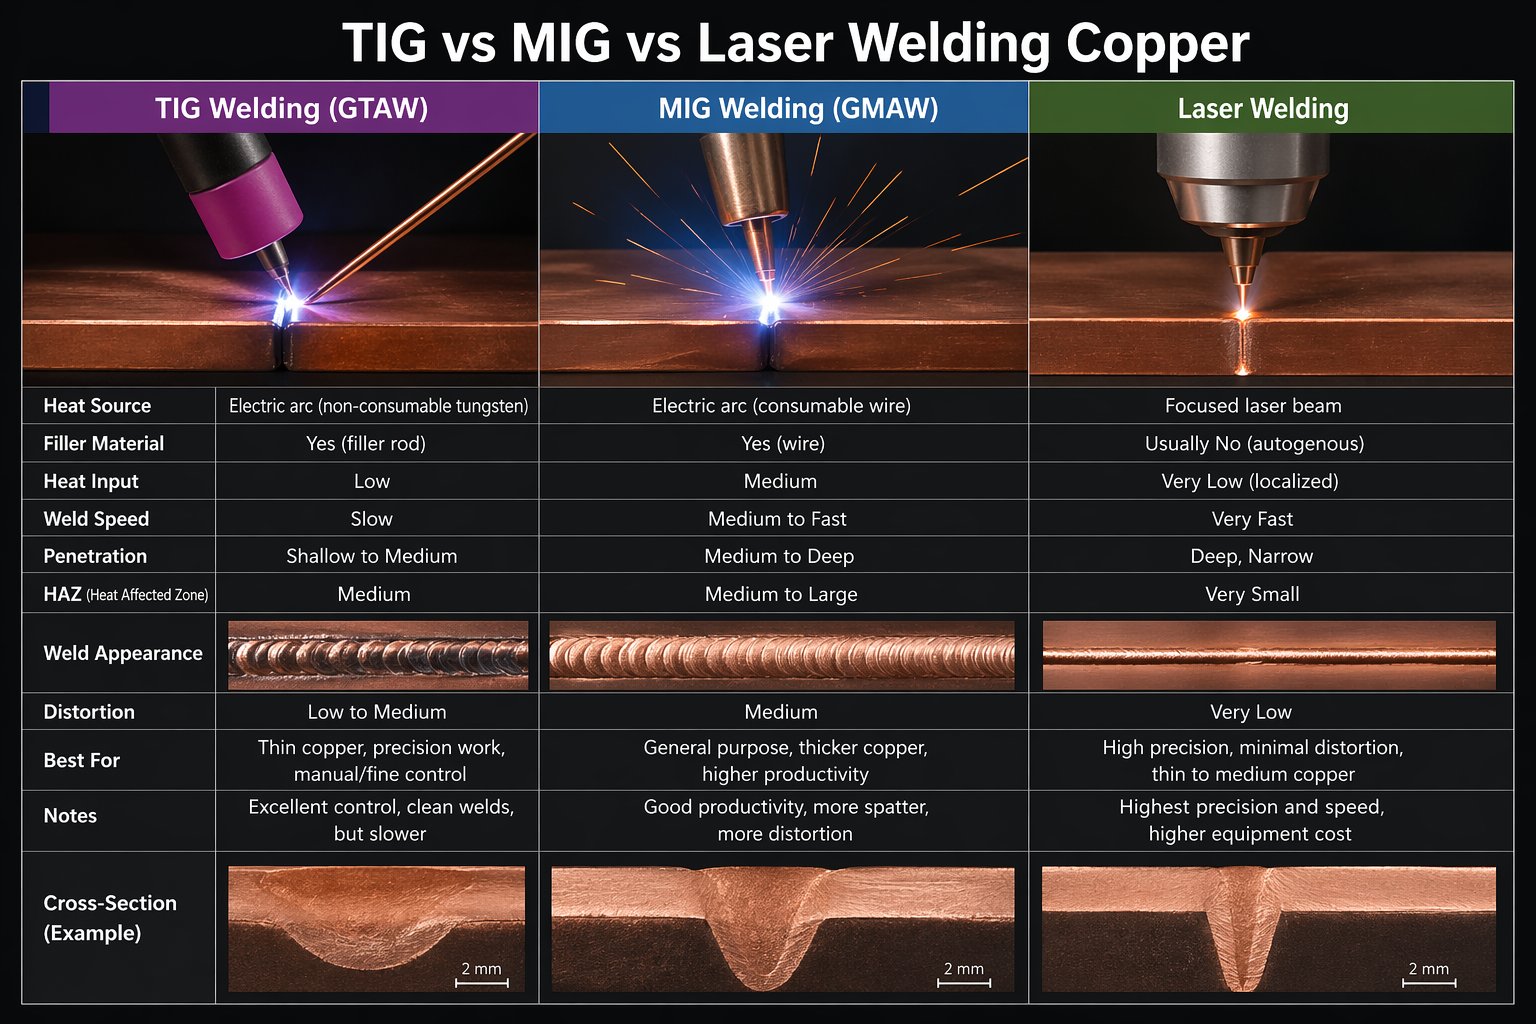
For beginners, the smart choice is simple: start with laser welding—especially for copper between 0.5–5mm. It removes most of the skill barriers, giving you clean, stable welds without fighting heat control.
On a tight budget? MIG can work for thicker copper, but expect more porosity and setup challenges. TIG delivers great results—but only after you’ve built real experience.
If you want fast, consistent results from day one, laser welding is the easiest path.
TIG Welding: Maximum Control, Maximum Commitment
TIG gives you the tightest heat-affected zone of any arc process — 1.2 mm. On copper, that precision matters a lot. Less heat spread means less distortion, better fusion, and lower porosity rates than MIG can produce with consistency.
The catch? TIG demands real skill. Torch angle, filler timing, travel speed — you manage every variable at once. The learning curve runs 2–3x longer than MIG. For a beginner already dealing with copper’s punishing thermal behavior, that’s a steep entry point. TIG rewards patience and practice. It doesn’t forgive shortcuts.
Best for:
– Thin copper sheets under 1/16″
– High-precision joints
– Electrical components where conductivity and clean seams are non-negotiable
MIG Welding: Faster Entry, Real Tradeoffs
MIG covers a practical thickness range — 1/16″ to 1/2″ (1.6–12.7 mm) — and carries the lowest learning curve of the three. That makes it the go-to starting point for beginners working with medium-gauge copper.
But copper punishes MIG’s larger heat-affected zone (~3.5 mm). Porosity risk runs 2–3x higher than TIG. Spatter goes up. Arc stability on copper needs constant parameter adjustment — 18–22V with 150–250 IPM wire speed — and you still need to clean the joint between passes.
Best for:
– Budget-conscious batch work on thicker copper
– Jobs where minor defects are acceptable
– Situations where speed matters more than perfection
Laser Welding: The Beginner’s Shortcut Nobody Talks About
Laser welding sits at the opposite end of the skill spectrum — not in complexity, but in forgiveness. HAZ drops below 0.5 mm. Speed hits 10x faster than arc methods. Post-processing cleanup falls to under 5%, compared to 20–30% for TIG or MIG.
On copper, laser’s precision cuts out the arc instability that makes TIG and MIG so unforgiving. A 1kW fiber unit at 1064nm — set to 1,000–2,000W power, 1–2 m/min travel speed — handles 1mm copper sheet with clean, consistent results. You don’t need a steady torch hand to get there.
Initial investment runs high. But long-term operating costs drop 30–50% compared to arc methods.
Best for:
– Thin-to-medium copper (0.5–5mm)
– Precision parts
– Beginners who need repeatable results without years of arc practice
Tools and Materials You Need Before You Start Welding Copper
Get your gear sorted before you strike your first arc. This isn’t optional. The right setup is what separates a joint that holds from one that fails under load.
Here’s what you need, matched to your welding method when figuring out how to weld copper the right way.
Welding Equipment by Method
TIG Setup
– A machine with high-frequency arc start and enough amperage headroom for thicker sections
– DCEN polarity — your default for copper, not DCEP
– 2% thoriated tungsten electrode — it holds a stable arc longer than any general-purpose option
– For sections near 1/2″ thickness, preheat to 650°F before the arc touches the joint
MIG Setup
– Pulse welding capability is key here — it keeps heat input under control. This cuts distortion and burn-through risk by a real margin
– Run DCEP polarity, the same as standard steel MIG work
– MIG’s higher deposition rate makes it the go-to choice for thick copper sections
Laser Welding Setup (Easiest to Use, Most Stable)
– Set the appropriate power based on copper thickness (typically ideal for 0.5–5mm)
– Ensure the laser is precisely focused on the weld seam — no complex setup required
– Preheating is usually unnecessary, allowing for quick startup and stable operation
– Minimal heat-affected zone and low distortion, making it highly beginner-friendly with a higher success rate
Filler Rods
Match your filler to your base metal. This one step cuts out most porosity problems before welding even starts.
- ERCu — pure copper jobs, top metallurgical compatibility
- ERCuSi-A — pure copper, copper-silicon, and copper-zinc alloys
- ERCuAl-A2 — aluminum bronze, or any copper-to-dissimilar-metal job
- ERCuNi — copper-nickel alloys only
- Silicon bronze MIG wire — the standard pick for MIG brazing bronze alloys
Always clean oxidized welds between each pass on multi-pass work. Skip this and contamination goes straight into your next bead.
Shielding Gas
- TIG and MIG: start with 100% argon. Shift to an argon-helium mix for deeper penetration or a hotter arc on thick sections
- More helium = more heat = faster travel speed on tough copper joints
Supporting Supplies
- Wire brush — between-pass cleaning and final inspection
- Degreasers and cleaning solvents — oils, paint, and grease on copper cause porosity before you lay a single bead
- Clamps and fixtures — copper moves fast under heat. Secure every workpiece with zero gaps at mating surfaces
One thing to keep in mind: amperage, voltage, wire feed speed, and shielding gas flow all shift together as thickness changes. No single setting works across all copper jobs. Dial in each variable per joint, per thickness.
How to Weld Copper Pipe: A Practical Guide for Plumbing and Tube Applications
Copper pipe work looks simple—until a joint leaks.
For plumbing, you’re not doing fusion welding. You’re using soldering (sweating). That distinction matters. Most residential systems run at 100–200 psi, and properly done soldering delivers reliable, code-compliant joints.
Here’s the process, simplified to what matters most:
Step 1: Cut, Deburr, and Clean
Everything starts before heat is applied.
- Cut with a tubing cutter. Tighten gradually and rotate—don’t force it, or you’ll deform the pipe.
- Deburr the inside edge. Remove shavings to prevent contamination.
- Clean to bright copper. Both the pipe end and fitting interior must be shiny—oxidized copper won’t bond.
- Apply flux evenly. Coat both surfaces lightly, then fully seat the pipe into the fitting.
Step 2: Heat the Joint the Right Way
This is where most beginners lose control. The instinct is to point the torch at the pipe. That’s the wrong move.
- Point your torch at the middle of the fitting, not the pipe. Heat for 4–5 seconds until the flux starts to sizzle.
- Shift the flame to the opposite side from where you’ll feed solder. This spreads heat around the joint.
- Touch solder to the pipe — not to the flame. It melts and pulls inward fast? The joint is ready. Pull the torch away the moment solder starts flowing. More heat burns off the flux and risks melting through the pipe wall.
Total torch time on a ½” joint: 10–20 seconds. That’s it.
Temperature target: 400–450°C. At that range, capillary action does the real work — pulling molten solder into every gap inside the fitting socket.
Two failure signs to recognize:
– Solder blobs on the outside but doesn’t fill the joint → overheated. Re-flux, reheat, add solder.
– Solder won’t flow at all → underheated, or the surface wasn’t cleaned well enough.
Choosing Your Filler: 95/5 Solder vs. Copper-Phos Brazing Rod
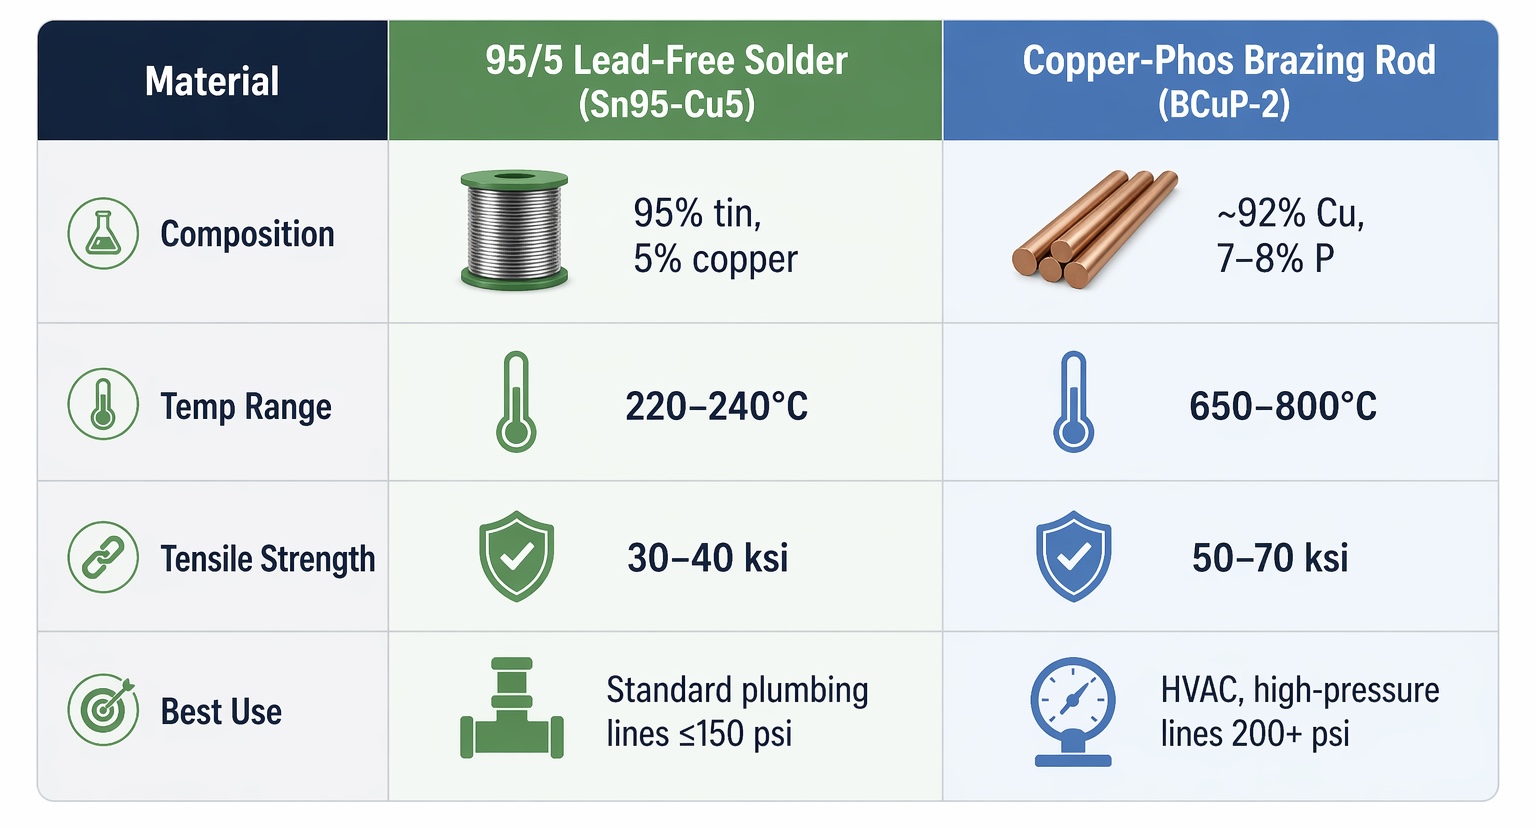
For most residential plumbing, 95/5 solder is the best choice.
Use brazing rods for higher pressure or vibration-heavy systems.
Step 3: Inspect the Finished Joint
Check the joint by eye before running any pressure test.
- Look for a full silver band — solder should wrap flush and continuous around the entire joint circumference. No gaps. No blobs. A dull, lumpy finish means poor flow.
- Pressure test at 1.5x operating pressure — a 100 psi water line gets tested at 150 psi with air and soapy water for 15–30 minutes. No bubbles means a clean pass.
The band looks incomplete? Don’t leave it. Re-flux the area, reheat, and feed solder until the full band forms. A partial joint that “looks close” will fail under sustained pressure — and it’ll go at the worst possible time.
Common Copper Welding Problems and How to Fix Them
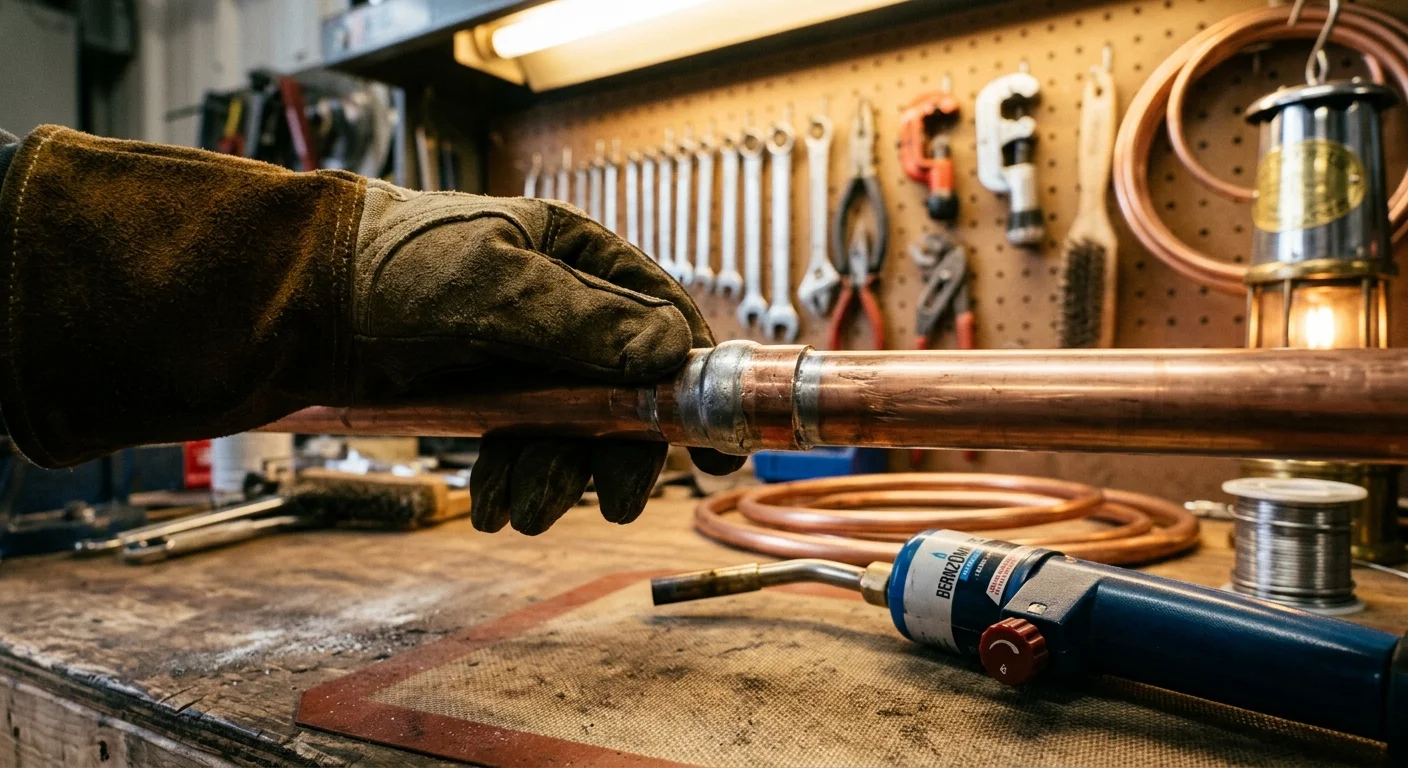
Even experienced welders get humbled by copper. The problems that show up — porosity, cracking, distortion, weak joints — aren’t random. Each one traces back to a specific cause. Each one has a specific fix.
Porosity: The Silent Joint Killer
Porosity is the most common copper welding defect. It comes from one of three sources:
- Surface contamination. Oil, grease, or oxidation on the pipe or fitting pushes foreign gases into the molten pool. Clean every surface with solvent before flux goes on. No shortcuts here.
- Insufficient flux coverage. Thin or uneven flux leaves copper exposed to oxidation mid-weld. Put on a generous, consistent layer — and confirm you’re using a flux rated for your specific copper alloy.
- Moisture in your filler rod. Absorbed moisture vaporizes inside the melt pool and leaves voids. Store rods dry, and match rod diameter to your pipe wall thickness.
Porosity shows up in a finished weld? Remove the weld in full. Find the root cause before re-welding — patching over a porosity problem never holds.
Cracking: Hot vs. Cold, and Why the Difference Matters
Hot cracking occurs at solidification. Excessive heat, copper oxide contamination, and high residual shrinkage stress all play a role. The weld pulls apart as it cools. Cold cracking shows up after the weld sets — often from poor ductility or no preheat on thicker sections.
A wrong filler rod diameter makes both worse. A rod too large for the joint overloads heat input and causes incomplete fusion. Match rod size to pipe thickness. Keep the correct angle into the molten pool. Add filler in small, controlled steps.
Weak Joints: A Five-Point Self-Check
A joint that looks finished but fails under pressure often has one of these problems:
- Cold weld — dull, porous surface, no real fusion. Heat was too low.
- Lack of penetration — gaps from low heat or poor filler technique.
- Misalignment — movement during welding blocks proper fusion.
- Oxidation or porosity — dark discoloration signals flux failure or contamination.
- Incomplete solder fill — partial coverage that corrodes from the inside out.
Before each weld: verify alignment, check gas pressure for pipe size, clean with solvent, apply even flux, and use the correct rod angle with a slow, deliberate travel speed. After welding: look over the surface for dull or porous spots, then pressure-test at 1.5x operating pressure.
Distortion on Thin Copper Sheet
Thin copper warps fast — faster than you can correct by feel alone. Three strategies keep distortion under control:
- Swing the torch back and forth across the joint rather than holding it in one spot. Local overheating is the main distortion trigger.
- Clamp everything. Good fixturing stops movement before it starts.
- Use heat sinks on either side of the joint. Spreading heat out stops the uneven expansion that bends thin sheet out of plane.
A neutral flame matters here too. An oxidizing flame on copper spreads heat unevenly and raises the risk of undercut — a groove burned along the weld edge that weakens the joint and traps corrosion.
Copper Welding Safety: Hazards Beginners Often Underestimate
Copper oxide fume is odorless. It’s invisible at dangerous concentrations. And it will make you sick 24 hours after you’ve packed up and gone home.
That delayed onset is the exact reason beginners underestimate it — and the exact reason it matters most.
Copper Fume Fever Is Real, and the Numbers Are Stark
NIOSH sets the permissible exposure limit for copper fume (CuO) at just 0.1 mg/m³ TWA. That threshold is very low. Standard garage ventilation and open windows can’t hold below it. The fume particles are ultrafine nanoparticles — invisible to the naked eye at concentrations that are already dangerous.
Exposure symptoms include eye irritation, dry throat, chills, muscle ache, nausea, and classic metal fume fever. Clinical data tells a clear story: in a controlled 6-hour zinc-plus-copper fume exposure study, participants showed no significant lung function drop during the session. At 24 hours, FEV1 had fallen 147 ml (3.2%). One week later, airway resistance was still elevated. The damage is inflammatory — not immediate. You feel fine while copper welding. Then you deteriorate overnight.
Beginners welding brass, bronze, or copper-clad materials face a bigger risk. Zinc-containing alloys trigger metal fume fever harder than pure copper does. Combined zinc-copper exposure causes airway constriction that can last beyond one week. Most beginners don’t see this coming.
Respirator thresholds per NIOSH:
| Concentration | Required Protection |
|---|---|
| Up to 1 mg/m³ | N95/P95 filtering facepiece |
| Up to 5 mg/m³ | Full-facepiece with P100 filter |
| Unknown/IDLH | Full-facepiece SCBA, pressure-demand |
Local exhaust ventilation (LEV) placed within 6–8 inches of the weld zone is required for any indoor copper work. General room airflow is not a substitute.
Fire Risk Travels Farther Than You Expect
Copper’s thermal conductivity sits at ~385 W/m·K — about 25 times higher than steel. Heat at the weld point races along the pipe or sheet, reaching combustibles 12–18 inches away with no visible warning. Copper pipe running through walls pushes heat into hidden cavities. Fires have started inside walls after the welder left the area.
Two things beginners miss on a regular basis:
-
Copper doesn’t glow red before melting. Steel gives you a color warning. Copper gives you nothing — burn injuries and workpiece damage show up without any signal.
-
The standard 30-minute post-weld fire watch is not enough for copper. Extend it to at least 60 minutes, given the high conductivity.
Start Safe: Beginner Practice Protocol
Build your skills under controlled conditions before touching any real copper installation:
-
Practice flat butt joints on fire brick using 99.9% pure copper scrap — no coatings, no mystery alloys
-
Skip brass, bronze, or copper-clad scrap until you’ve fully mastered pure copper fume management
-
Never use painted, galvanized, or unidentified scrap — coatings release lead, zinc, or cadmium fumes you can’t see
-
Treat every practice session as a fume-exposure event, even outdoors
-
After each session, touch-test surrounding surfaces with the back of your hand and wait a minimum of 30 minutes before leaving
The risk isn’t dramatic. It’s quiet, delayed, and easy to brush off — which is exactly what makes it the kind of hazard that catches beginners the hardest.
Conclusion
Copper doesn’t forgive shortcuts — but it rewards preparation.
Everything in this guide points to one truth: welding copper isn’t about raw skill. It’s about understanding the metal first. Respect its thermal conductivity. Preheat it before you start. Choose the right method — TIG welding copper is the gold standard for most applications. Do those things, and half your battle is won before you strike an arc.
Still unsure where to start? Don’t overthink it. Pick your application — pipe, sheet, or fitting. Revisit the relevant section. Then run a few practice beads on scrap copper first. That one habit will save you more frustration than any tip in this article.
Welding copper has a steeper learning curve than steel. But once it clicks, you’ve mastered one of the most challenging and satisfying skills in the trade.
Now stop reading. Go weld something.